


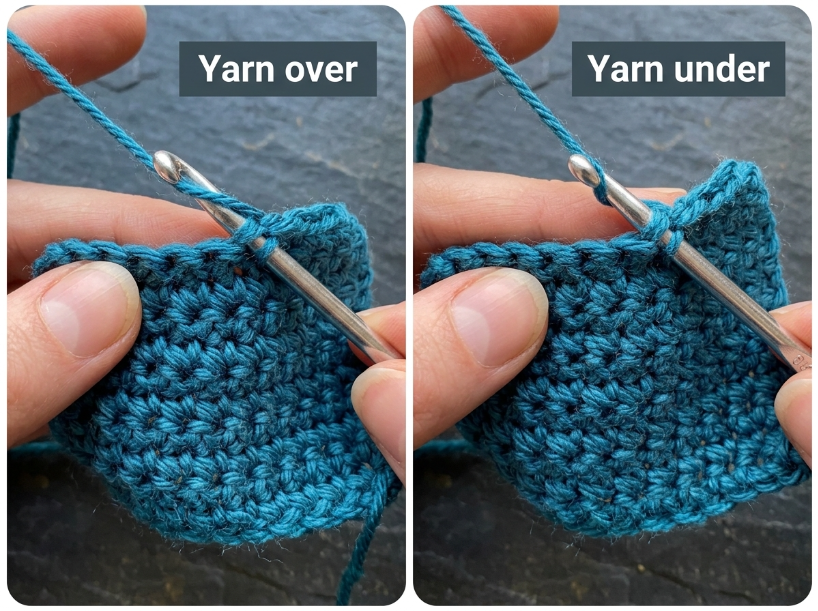
The direction yarn wraps around the hook before pulling through loops determines whether a stitch forms with an open base or a twisted one. Most patterns assume yarn over as the default method, but the physical difference between the two wrapping directions affects fabric density, drape, and visual texture in ways that become obvious once you know what to look for.
The Short Answer
Yarn over is the standard wrapping method in most modern crochet patterns and produces the conventional stitch structure. Yarn under wraps clockwise from front to back and produces twisted stitches with denser fabric. Most Western patterns assume yarn over unless explicitly stated otherwise.
Main Steps
Standard crochet instructions typically expect yarn over for every stitch. The hook catches the working yarn from behind, wraps it counterclockwise over the hook shaft, and pulls it through the loops on the hook. This creates a stitch base where the yarn strands lie parallel without crossing. The completed stitch can still present the familiar two-loop V at the top, which is why the difference in wrapping direction can be easy to miss when you are learning.
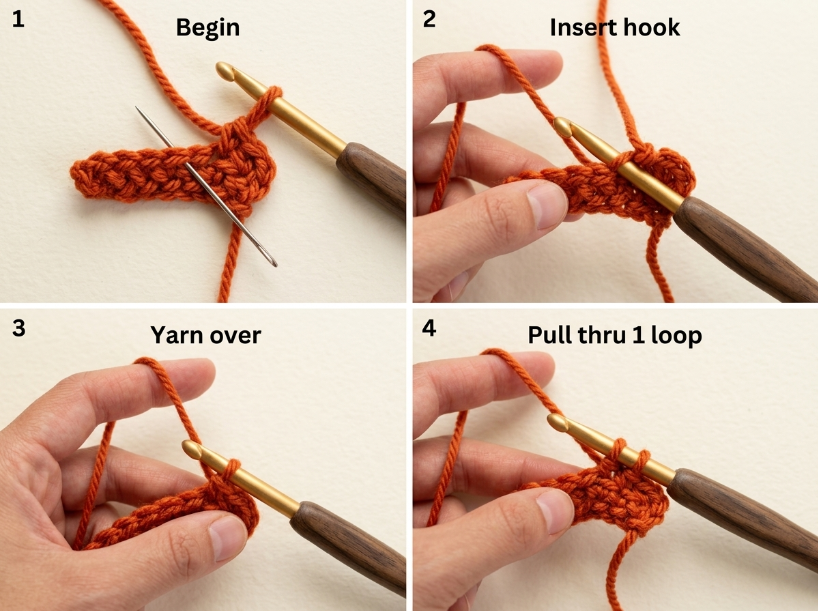
Yarn under reverses this motion. The hook catches the yarn from the front, wraps it clockwise under the hook, and pulls through. The reversed wrapping motion changes the orientation of the yarn within the stitch, producing a more twisted-looking stitch and often a denser fabric. This method is not standard in modern Western crochet, so using it unintentionally throughout a project can create visible texture differences compared to the pattern’s intended result. If you need to understand how yarn weight interacts with stitch structure, How to Choose Yarn Size for Crochet covers that relationship in depth.
Many guides say yarn over is the correct method for following patterns. That is generally true if you are working from a standard written or charted pattern, which assumes yarn over as the default. In practice, some regional or historical crochet traditions use yarn under as their standard method, and if you learned from a crocheter who uses that technique, your muscle memory may default to it without you realizing the difference.
| Step | What to do | Watch out for |
|---|---|---|
| Position the hook | Hold the hook with the throat facing you and the working yarn behind the hook | If the yarn is in front of the hook, you are set up for yarn under |
| Wrap the yarn | Bring the yarn counterclockwise over the hook from back to front | Wrapping clockwise creates a twisted stitch |
| Pull through loops | Draw the wrapped yarn through the loops on the hook in one smooth motion | Tension affects how easily the yarn pulls through |
| Check stitch appearance | Compare a few completed stitches with a known yarn-over swatch | A different stitch orientation or texture can indicate that your wrapping motion has changed |
Comparison / Options
Compared with yarn under, yarn over will often produce a more conventional and less twisted stitch structure. Depending on the stitch, yarn, hook size, and tension, the resulting fabric may also have more flexibility and drape. This makes it a great choice for garments, shawls, and any project where the fabric needs to move naturally with the body or hang without stiffness. The open stitch structure also makes it easier to identify individual stitches when you need to count rows or insert the hook into a specific loop. The tradeoff is that this openness can create gaps in projects that need tight, dense fabric, like amigurumi or bags that will hold weight.
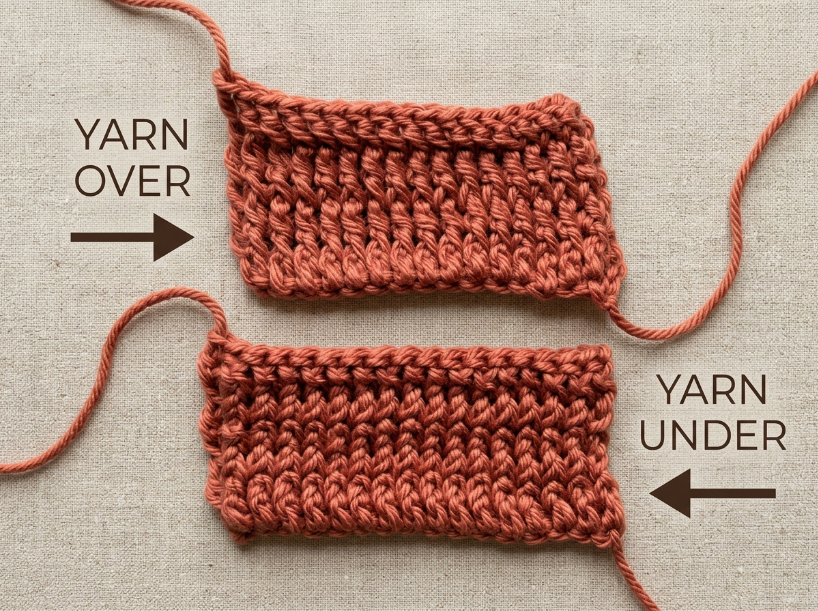
Yarn under often produces a denser-feeling fabric and can reduce flexibility because the stitch structure is more twisted. The exact effect depends on the stitch, yarn, hook size, and tension. This can be useful for projects that need extra structure or a tighter weave, but it is not a standard technique in Western patterns, so using it often requires adjusting gauge and stitch count. If you are working through a pattern that specifies double crochet, How to Double Crochet walks through the standard yarn over technique in detail.
Most beginners are told to stick with yarn over because it matches pattern instructions. That is solid advice for following standard patterns without modification. Even so, if you have been crocheting for years using yarn under and your gauge consistently matches pattern requirements, switching to yarn over just for the sake of convention may not significantly improve your results. The real issue arises when you alternate between the two methods within the same project without realizing it, which creates visible texture differences that are very difficult to block out.
Common Mistakes
Wrapping the yarn under the hook by accident is a frequent mistake, especially for crocheters who learned by watching videos without audio or from a teacher who used yarn under as their default. The stitch completes normally, so the error isn’t obvious until you compare your fabric to the pattern photo and notice the texture looks tighter or more twisted. The fix is to watch the wrapping motion carefully for a few rows until yarn over becomes automatic. That said, if your entire project uses yarn under consistently, the fabric will look uniform, and the only issue is that your gauge may differ from the pattern’s expected measurements.
Another mistake is assuming yarn under creates stronger fabric simply because it looks denser. The twist at the stitch base does make the fabric less stretchy, but it does not necessarily make it more durable. The yarn fibers still bear the same load. If durability is the goal, tighter tension with yarn over can achieve similar density without the stiffness that comes from twisted stitches.
Some crocheters try to use yarn under intentionally for amigurumi, thinking the denser fabric will prevent stuffing from showing through. This can help create a tighter-looking fabric, although hook size and tension are usually more controllable ways to manage gaps. It also makes the stitches harder to work into on the next round, which slows progress and increases hand fatigue. A smaller hook with yarn over can produce tight fabric without the ergonomic cost of forcing the hook through twisted stitch bases.
Troubleshooting
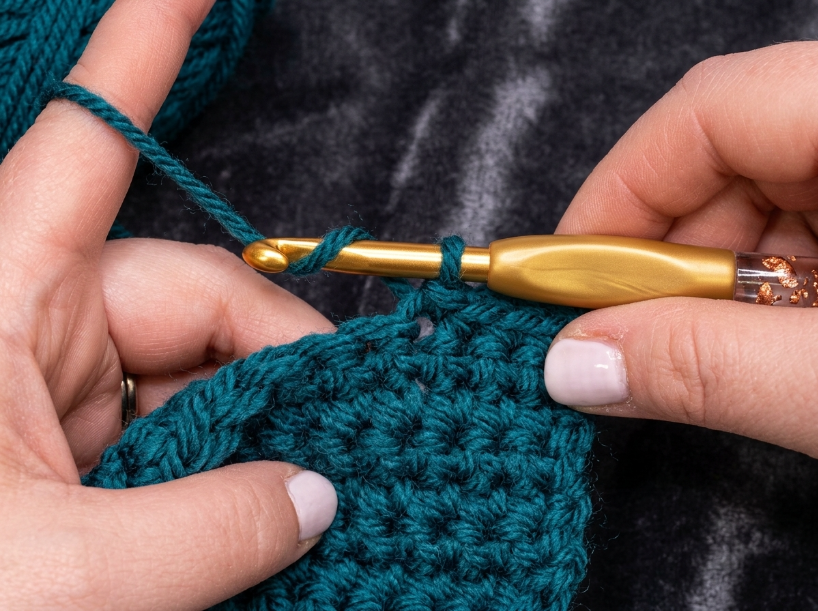
If your fabric looks twisted or denser than the pattern photo, check whether you are wrapping the yarn under the hook instead of over. Hold the hook so the throat faces you and confirm the yarn is coming from behind the hook before you wrap. The yarn should move counterclockwise in a smooth arc over the top of the hook. If it is moving clockwise or starting from in front of the hook, that is yarn under.
The fix works for most stitches, but slip stitches and foundation chains can still look slightly different depending on wrapping direction. Slip stitches are so short that the twist is barely visible, and foundation chains are usually worked with yarn over by default, so the wrapping direction only becomes an issue if you are trying to match a specific texture. In contrast, taller stitches like double crochet show the twist more obviously because the stitch base is more exposed.
If you have been using yarn under for an entire project and only realize it halfway through, switching to yarn over mid-project will create a visible texture change. The better fix is to continue with yarn under for consistency and adjust the hook size if the gauge is off. Alternatively, rip back to the beginning and restart with yarn over if matching the pattern texture is more important than preserving the work you have already done.
| Mistake | Why it happens | Fix |
|---|---|---|
| Stitches look twisted | Wrapping yarn clockwise under the hook instead of counterclockwise over | Watch the wrapping motion and confirm the yarn starts behind the hook |
| Fabric is denser than expected | Yarn under creates tighter stitches even with the same hook size | Switch to yarn over or use a larger hook to compensate |
| Gauge doesn’t match pattern | Twisted stitches change stitch height and width | Measure a gauge swatch and adjust hook size accordingly |
| Stitches are hard to work into | Yarn under creates a tighter stitch base that resists the hook | Use yarn over for easier stitch insertion or a hook with a sharper point |
Questions You Might Still Have
Q: What is the easiest way to practice yarn over for a beginner?
Work a small swatch of single crochet, focusing only on the wrapping motion. Hold the hook so the throat faces you and confirm the yarn is behind the hook before every wrap. The motion should feel smooth and consistent, with the yarn moving counterclockwise over the hook in one fluid arc. If the wrap feels awkward or the stitches look twisted, slow down and watch the yarn path carefully.
Q: How long does it take to retrain muscle memory from yarn under to yarn over?
Results vary with how long you have been using yarn under and how often you crochet. Some crocheters adjust within a few rows, while others need several projects before yarn over feels automatic. The key is to work slowly at first and check the wrapping direction frequently until the motion becomes natural.
Q: What hook size and yarn weight do I need to test the difference between yarn over and yarn under?
Any worsted weight yarn and an H hook work well for comparing the two methods. The stitch size is large enough to see the twist clearly, and the yarn is thick enough to show texture differences without needing magnification. Work a small swatch using yarn over, then work another using yarn under with the same hook and yarn, and compare the fabric density and drape.
Q: What are the most common mistakes when switching from yarn under to yarn over?
A common mistake is reverting to yarn under without noticing, especially when working quickly or focusing on stitch counts. Another mistake is wrapping the yarn too loosely in an attempt to make yarn over feel easier, which creates uneven tension and sloppy stitches. The wrap should be snug enough to maintain consistent tension without requiring excessive force.
Q: How do I fix it if I realize I’ve been using yarn under for an entire project?
If the fabric looks consistent and your gauge matches the pattern, the project is likely fine as-is. If the texture looks wrong or the gauge is off significantly, rip back to the beginning and restart with yarn over. Switching mid-project creates a visible line where the texture changes, which is difficult to block out.
Q: Is there a faster method for learning yarn over?
There is no shortcut, but working in good lighting and watching your hands closely for the first few rows helps speed up the learning process. Some crocheters find it helpful to say “back to front” out loud while wrapping the yarn until the motion becomes automatic. Avoid working in dim light or while distracted, as this increases the chance of reverting to old habits without noticing.
📅 Last reviewed: August 2026 · This article is reviewed every 12 months.
Summary
Yarn over wraps counterclockwise and creates standard, untwisted stitches, while yarn under wraps clockwise and produces denser, twisted fabric. Most Western patterns assume yarn over unless stated otherwise, so using yarn under unintentionally can create texture and gauge differences. If you have been using yarn under consistently and your gauge matches, the method works, but switching between the two within a project creates visible inconsistency. Once you understand the structural difference, checking your wrapping direction becomes a quick visual habit.

