Molding Bright Futures: Cutting-Edge Strategies for Growth
Krocheta
  • Home
  • Development
    DevelopmentShow More
    Nurturing Children’s Emotional Intelligence Through Play
    6 Min Read
    Creative Expression Fostering Artistic Talents in Children
    6 Min Read
    Encouraging Empathy Teaching Kindness to Children
    6 Min Read
    Cultivating Critical Thinking Skills in Youngsters
    6 Min Read
    Curiosity Unleashed Encouraging Exploration in Kids
    6 Min Read
  • Society
    SocietyShow More
    Social Harmony Lessons for Young Minds
    6 Min Read
    Cultural Awareness Nurturing Inclusivity in Kids
    6 Min Read
    Raising Compassionate Kids Values and Education
    6 Min Read
    The Power of Volunteering Kids Making a Difference
    6 Min Read
    Anti-Bullying Education Creating Safe Spaces
    6 Min Read
  • Pages
    • Blog Index
    • Contact Us
    • Search Page
    • 404 Page
  • Blog
Subscribe
Font ResizerAa
KrochetaKrocheta
  • Business
  • Learning & Education
  • Politics
  • Society
  • Travel
  • Development
  • Entertainment
  • Technology
  • Science
  • Contact Us
  • Technology
  • Donate US
  • Fashion
Search
  • Categories
    • Technology
    • Entertainment
    • Travel
    • Fashion
    • Business
    • Politics
    • Science
    • Health
  • Home
  • Categories
    • Learning & Education
    • Technology
    • Development
    • Society
  • More Foxiz
    • Donate US
    • Blog Index
    • Contact Us
    • Complaint
    • Sitemap
  • Bookmarks
  • More Foxiz
    • Sitemap
Follow US
Learn & Techniques

Why Your Crochet Projects Look Uneven (And How to Fix It Fast)

Patricia
By
Patricia
Last updated: April 8, 2026
Share


Contents
  • Why Your Crochet Projects Look Uneven (And How to Fix It Fast)
  • What Causes Uneven Crochet in Most Beginners
  • The Hidden Tension Problem You Don’t Notice While Crocheting
  • How Hook Size Affects Stitch Shape More Than You Think
  • The Most Common Stitch Mistake That Makes Projects Skew
  • Why Your Edges Keep Waving or Curling
  • How to Keep Your Stitch Count Perfect Every Row
  • Simple Techniques to Fix Uneven Crochet Immediately
  • When Your Yarn Choice Is Secretly Ruining Your Work
  • How to Make Your Finished Crochet Look Smooth and Professional
  • Final Fixes That Instantly Improve Your Crochet Quality
      • ✦ Recommended For You


Why Your Crochet Projects Look Uneven (And How to Fix It Fast)

There is nothing more discouraging than finishing a crochet project, holding it up to the light, and noticing that one side is wider than the other, the edges are doing something strange, and the whole thing looks like it was made by two different people on two different days. If that sounds familiar, you are not alone, and more importantly, you are not bad at crochet. You are just dealing with a set of very fixable problems that most beginners hit at exactly the same stage you are in right now.

I remember finishing my first granny square blanket and being genuinely confused. Every square looked slightly different from the last. Some were stiff, some were floppy, and the whole thing had a mysterious lean to the left that I could not explain. It took me an embarrassing amount of time to figure out that I was not following a pattern wrong, I was just making a handful of small, consistent errors that were compounding over hundreds of stitches.

This article is everything I wish someone had handed me back then. We are going to go deep on every major reason crochet looks uneven, and by the end, you will have a clear, actionable picture of exactly what to fix and how to fix it fast.


What Causes Uneven Crochet in Most Beginners

The first thing to understand is that uneven crochet is almost never caused by one single problem. It is almost always the result of several small habits working together in ways that are hard to see in the moment.

The compounding nature of small errors. When you make a stitch slightly tighter than the last, that single stitch does not ruin your project. But when you make two hundred slightly tighter stitches across thirty rows, the difference becomes impossible to ignore. Crochet is a system, and small inconsistencies compound just like interest in a savings account, except in this case, the interest is lumps and waves.

How human biology works against you. Your hands are not machines. Your grip changes when you are relaxed versus anxious, when you are watching television versus concentrating hard, and even depending on how long you have been crocheting that session. Fatigue changes tension. Distraction changes tension. Your mood changes tension. Acknowledging this is not an excuse, it is the first step to building habits that counteract it.

The pattern reading problem. A huge number of beginners make their crochet uneven not because of their hands at all, but because they are misreading the pattern. Skipping a stitch at the end of a row, accidentally working into the turning chain when you should not, or losing track of your stitch count are all pattern-reading issues that create structural unevenness rather than textural unevenness. These two types of problems look similar but have completely different solutions.

Problem Type Visual Result Root Cause
Tension inconsistency Wavy texture, stiff patches Hand grip variation
Stitch count error Growing or shrinking width Miscounting, missed stitches
Wrong hook size All stitches too open or too tight Gauge mismatch
Yarn splitting Fuzzy, uneven surface Hook angle or yarn type
Edge errors Wavy or curling borders Wrong turning chain height

Patricia’s Pro-Tip: Before you blame your hands, count your stitches at the end of every row for your next three projects. You might be surprised to find that your tension is perfectly fine, and your edges are just off because your stitch count keeps drifting by one or two.


The Hidden Tension Problem You Don’t Notice While Crocheting

Tension is the single most discussed concept in crochet for a reason. It is also the most misunderstood. Most beginners hear “tension” and think it means how tightly they are gripping the yarn. That is part of it, but only part of it.

Tension is a relationship, not a measurement. Your tension is the combination of how tightly you hold your yarn, the angle at which your hook enters the stitch, the speed at which you pull the hook through, and even how far apart your hands are from each other while you work. Change any one of these variables and your tension changes, even if your grip feels exactly the same.

The watch-TV trap. I call this the watch-TV trap because it happens to almost everyone. You sit down, you pick up your crochet, and you start working while half your attention is on something else. For the first few minutes, your tension is conscious and controlled. Then you relax into the show and your hands start doing whatever they want. Twenty minutes later, you look down and a section of your work looks visibly different from what you did at the beginning.

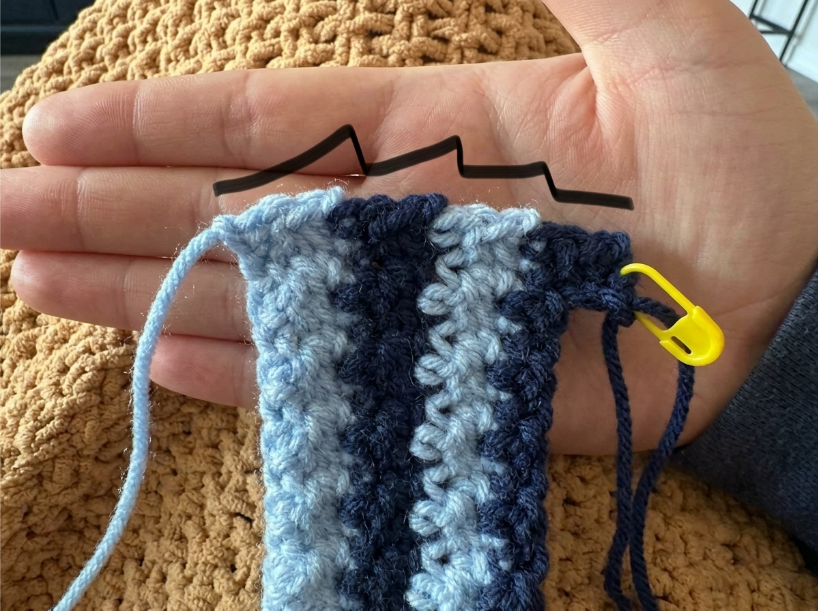
Why tension tightens at the end of rows. Here is something almost no tutorial mentions: most people’s tension tightens slightly at the end of a row because they are subconsciously rushing to get to the turn. Your hands speed up, your yarn feed gets less controlled, and the last five or six stitches of every row end up a little tighter than the rest. Over many rows, this creates a subtle trapezoid shape or a visible line of tighter stitches running diagonally across the work.

The yarn feed hand matters more than the hook hand. Most beginners focus entirely on the hand holding the hook, but the hand holding and feeding the yarn is actually the one controlling tension. If your yarn feed hand is inconsistent, sometimes releasing freely, sometimes gripping, your stitches will be inconsistent regardless of what your hook hand is doing.

Patricia’s Pro-Tip: Try this experiment. Crochet ten stitches completely normally. Then, without changing anything else, consciously slow down your yarn feed hand so the yarn flows at a perfectly even pace. Most people find their stitches immediately become more even. The hook hand follows the yarn hand, not the other way around.


How Hook Size Affects Stitch Shape More Than You Think

The relationship between hook size and stitch appearance is one of the most underestimated factors in crochet quality. Beginners often treat hook size as a fixed variable, the pattern says 5mm, so they use 5mm, end of story. In practice, it is far more nuanced than that.

What happens when your hook is too small. When you use a hook that is too small for your yarn weight, your stitches compress. They become tight little loops that sit close together, and the fabric you create has very little drape. It feels almost like a woven fabric rather than a knitted one. More importantly, it becomes very difficult to insert your hook cleanly into stitches on the next row because the openings are too small, which leads to yarn splitting, missed stitches, and uneven rows.

What happens when your hook is too large. The opposite problem creates a different kind of unevenness. When your hook is too large for your yarn, each stitch has too much space inside it. The loops slip around on the hook, and it becomes hard to maintain consistent loop size. Your finished fabric looks airy and open in places, but because loops are harder to control, individual stitches start to vary noticeably in height.

The gauge swatch is not optional. I know, I know, every crochet teacher in the world says this and almost no beginner actually does it. But making a small gauge swatch before a project takes ten minutes and saves hours of unraveling. The gauge swatch tells you whether the hook size in the pattern will give you the stitch size that makes the pattern work. If your gauge is off, your project will be uneven structurally even if your tension is perfect.

Hook brand and shape matter more than most people know. Inline hooks and tapered hooks create slightly different stitch shapes because the head geometry is different. If you have always used one brand and switch to another mid-project, your stitches can look noticeably different even if your technique is identical. This is not a flaw in your skill, it is just physics.

Hook Type Best For Effect on Stitch Shape
Inline (Bates style) Tight, even stitches Consistent loop height
Tapered (Boye style) Faster work, smoother pull Slightly rounder stitch head
Ergonomic handle Long sessions Reduces tension caused by fatigue
Steel hook (tiny sizes) Thread crochet, lace Very precise, unforgiving of errors
Bamboo / wood Slippery yarns Slows yarn, helpful for beginners

Patricia’s Pro-Tip: If you switch hook brands for any reason, crochet at least two full rows before judging the result. Your hands need time to adapt to the new geometry. Judging after just a few stitches will make you think the hook is wrong when really you just need to adjust.


The Most Common Stitch Mistake That Makes Projects Skew

Of all the technical problems that cause uneven crochet, there is one that is so common and so easy to miss that it deserves its own section. That problem is working into the wrong part of the stitch.

What “the top of the stitch” actually means. Every crochet stitch has a V-shape at the top, two loops forming a V when viewed from above. The standard instruction is to insert your hook under both loops of that V. Simple enough. But beginners frequently insert under only one loop, or into the space beside the stitch rather than through the stitch itself, without even realizing it.

What happens when you work under one loop. If you consistently work under only the front loop or only the back loop of every stitch, you will actually create a very consistent fabric, it will just have a specific textured appearance that is different from what the pattern intends. The real problem happens when you sometimes go under both loops and sometimes under one. This inconsistency creates stitches of slightly different heights and angles, which makes your fabric look lopsided or wavy.

The skewing problem. Many beginners notice that their rectangular projects gradually skew into a parallelogram. They assume this is a tension issue, but it is almost always a stitch angle issue. When you habitually enter stitches from a slightly off-center angle, either tilting the hook toward you or away from you more than necessary, the stitches themselves lean in that direction. Over many rows, this lean accumulates into a visible diagonal skew.

How to self-diagnose this problem. Hold your work up to a bright window or a lamp and look at the stitches at a low angle. Consistent stitches should all lean at the same angle and have approximately the same height. If some stitches look like they are leaning forward and others backward in an alternating pattern, you are entering the stitch from an inconsistent angle.

Patricia’s Pro-Tip: When you are first learning to find the correct stitch insertion point, use a stitch marker in a color that pops against your yarn. Mark the stitch you are about to work into before you insert your hook. This one extra second of visual confirmation trains your eye much faster than trying to learn by feel alone.


Why Your Edges Keep Waving or Curling

Wavy or curling edges are the most visually obvious sign of unevenness in a crochet project, and they make even beautifully worked center stitches look like a mess. There are three main causes, and they each need a different fix.

The turning chain height problem. At the end of every row, you make a turning chain, one, two, or three chains depending on the height of the stitch you are working. This turning chain is supposed to match the height of the first stitch in the new row. If it is too tall, it creates a loose, wavy column at the edge. If it is too short, it pulls the edge inward and causes curling. Most patterns specify the turning chain length, but different crocheters chain with different tensions, which means the “standard” instruction does not always produce the correct result for your specific hands.

The edge stitch counting trap. Another extremely common cause of wavy edges is accidentally increasing or decreasing at the edges without meaning to. This happens when you misidentify the first or last stitch of a row and either skip it or add an extra one. Even a consistent gain or loss of one stitch every two rows will create a visibly flared or narrowing edge within twenty rows.

Tension at the edges versus the center. Many people hold their work differently when they are at the beginning of a row versus the middle. At the beginning, they are turning the work, adjusting their grip, and getting settled, so those edge stitches are often tighter. At the end of a row, as mentioned earlier, tension often tightens again. This creates a pattern where the center stitches are consistently looser than the edge stitches, which over time causes the edges to draw in and the center to belly outward, the classic “wavy scarf” effect.

Patricia’s Pro-Tip: For any project where flat, even edges matter, scarves, blankets, dishcloths, put a locking stitch marker in both the first and last stitch of every row before you start working it. This eliminates the guesswork about where the row starts and ends and prevents accidental increases or decreases at the edges entirely.


How to Keep Your Stitch Count Perfect Every Row

Once you understand why edges go wrong, the solution becomes about building systems rather than trying harder. Trying harder at crochet rarely works. Building better habits always does.

Count at the end, not the beginning. Many beginners count stitches at the start of a row to confirm they have the right number before they begin. This sounds logical but it is actually less reliable than counting at the end of the row. Counting stitches mid-progress, while your hands are moving and your attention is on the next stitch, leads to miscounts. Finish the row first, then count. If your number is off, you know the error happened in that row and can look for it immediately.

Use a row counter without guilt. There is a strange culture in some crafting communities that treats using tools as a crutch. A row counter is not a crutch, it is just good sense. Keeping track of row numbers mentally while also managing tension, pattern repeats, and stitch placement is asking your brain to do too many things at once. A small row counter, either a physical clicker or an app, removes one cognitive task entirely and immediately improves consistency.

The magic of stitch markers every ten. If you are working a long row, say, a blanket row with 200 stitches, place a stitch marker every ten stitches as you go. When you get to the end of the row, counting becomes trivially easy: count the groups of ten and add any remainder. If your count is off, you only have to look within a group of ten to find the error rather than scanning 200 stitches.

What to do when the count is wrong. When you finish a row and find you have one too many or one too few stitches, resist the urge to just fudge it and move on. A one-stitch error in row fifteen creates a structural problem that gets larger and more visible for every row after that. Ripping back one row is fifteen minutes of work. Ripping back twenty rows because you fudged fifteen of them is an afternoon.


Simple Techniques to Fix Uneven Crochet Immediately

This section is for when you need results right now, not after ten more hours of practice. These are the fastest techniques for immediate visible improvement.

Slow down your yarn pull. The fastest single change you can make to your crochet is to deliberately slow down the moment when you pull the yarn through the loops on your hook. Most beginners pull through quickly without thinking about it. Slowing down that one movement by even half a second gives you time to feel whether the loop tension is matching your previous stitches, and you naturally begin to self-correct in real time.

Work in good light. This sounds obvious but it changes everything. Working in dim light or with yarn colors that are close to your surroundings makes it impossible to clearly see your stitch structure. When you cannot see your stitches clearly, you stop being able to monitor your technique in real time. Natural daylight is ideal, but a good craft lamp is a genuine game-changer.

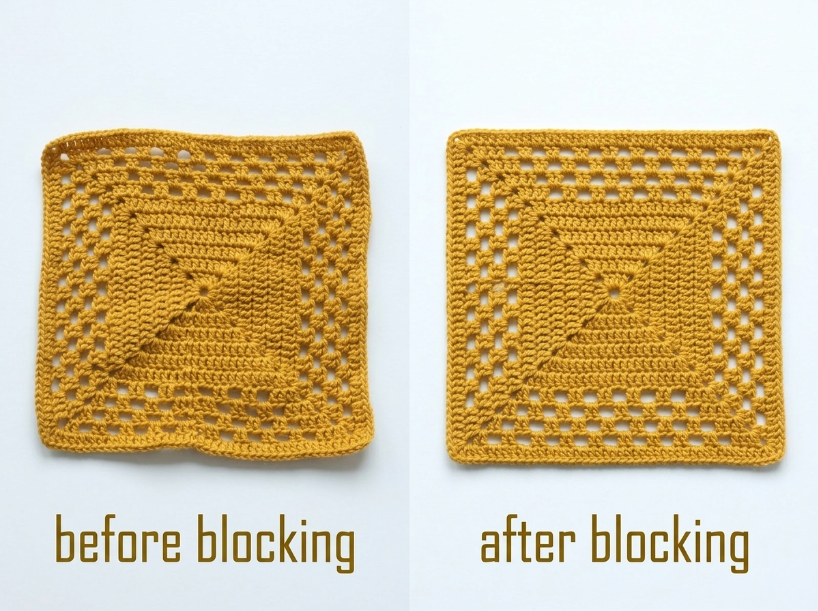
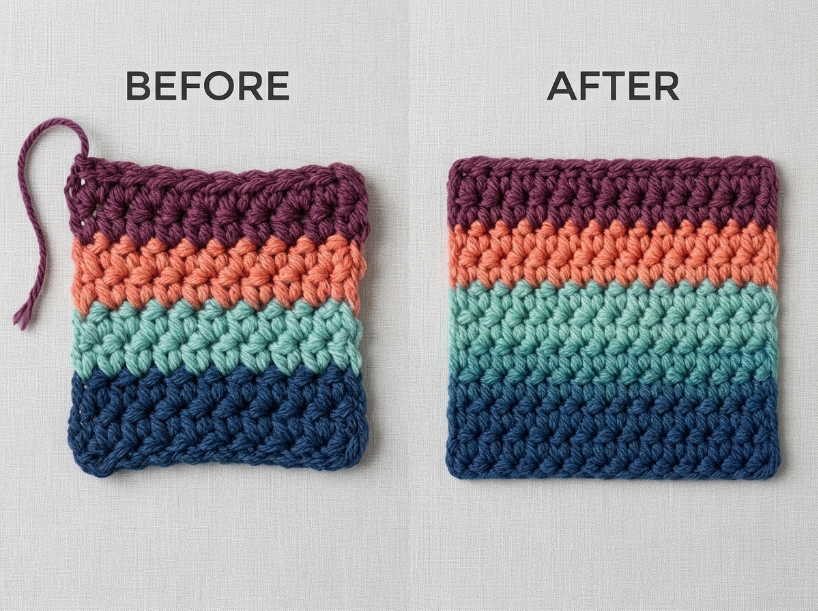
The blocking option. Blocking is the process of wetting or steaming a finished crochet piece and pinning it into shape while it dries. For natural fibers like wool and cotton, blocking can transform a lumpy, uneven finished object into something that looks professionally made. It does not fix structural problems like skewing or incorrect stitch counts, but it absolutely fixes tension-related unevenness and tames minor edge waves. Every crocheter should know how to block.

Frog early, frog often. “Frogging”, unraveling your crochet, gets a bad reputation among beginners because it feels like failure. It is not failure. It is the fastest path to a good result. Every experienced crocheter frogs regularly. The difference between a beginner and an experienced crocheter is not that the experienced crocheter makes fewer mistakes, it is that they catch mistakes earlier and frog without drama.


When Your Yarn Choice Is Secretly Ruining Your Work

This is the section nobody talks about enough, and I think it is because yarn choice feels like a matter of personal taste rather than technique. In reality, the yarn you choose has a massive technical impact on how your finished project looks.

Why beginners should avoid splitty yarn. Splitty yarn is yarn that separates easily into its component plies when you insert a hook. Most of the time, you want to catch all the plies together to form a clean stitch. With splitty yarn, it is easy to accidentally split the yarn and catch only some of the plies, which creates stitches of inconsistent thickness and a fuzzy, uneven texture. Beginners have enough to manage without fighting their material.

The texture problem. Highly textured yarns, bouclé, chenille, fur-effect yarns, are visually gorgeous in the skein and genuinely difficult to crochet with for beginners. They obscure the stitch structure, making it almost impossible to see where you are inserting your hook, which leads to frequent stitch errors. Save these for when your technique is solid enough that you can feel correct stitch placement rather than needing to see it.

How yarn weight interacts with pattern structure. Using a heavier yarn than a pattern specifies does not just make the project larger, it changes the structural relationship between stitches. Heavier yarn stitches take up more physical space, which means the turning chains that worked perfectly at the specified weight are now too short or too long, the stitch openings are harder to navigate, and the overall fabric drapes differently. When you substitute yarn weight, you are rewriting the pattern’s physics.

The best yarn for practicing technique. For pure technique practice, a smooth, medium-weight (worsted or DK weight) yarn in a light or medium solid color is unbeatable. The smooth surface makes every stitch structure clearly visible. The light color means you can see individual loops clearly. The medium weight is forgiving enough for beginners but precise enough to show you exactly what your technique is doing.


How to Make Your Finished Crochet Look Smooth and Professional

There is a gap between technically correct crochet and crochet that looks genuinely polished. Closing that gap is mostly about finishing work, and most beginners skip finishing work entirely.

Weaving in ends properly. Weaving in ends is unglamorous, but it is one of the most visible markers of quality. Ends that are woven in correctly, threaded through multiple directions of stitches rather than just pulled through once, are invisible and secure. Ends that are not woven in properly poke out, create bumps, and eventually come loose. Take the extra three minutes per end. It shows.

How to seam pieces so seams disappear. If your project is made of joined pieces, granny squares, separate panels, the seam method you use changes the finished look dramatically. A slip stitch seam is fast but creates a visible ridge. A mattress stitch seam is nearly invisible when done correctly. For anything you want to look professional, learning the mattress stitch for crochet is worth every minute of the learning curve.

Steam blocking versus wet blocking. Wet blocking works beautifully for natural fibers that respond to water, wool, cotton, linen, alpaca. Steam blocking is faster and works better for acrylic yarns, which are essentially plastic and do not respond to water tension. Using the wrong blocking method for your fiber type either does nothing or, in the case of steaming wool too aggressively, permanently flattens the fiber and kills its elasticity. Know your fiber.

Pressing edges while damp. For flat projects like blankets and scarves, pressing the edges down with your hands while they are still slightly damp from blocking sets them into a flat position. Once dry, they hold that shape. This one step transforms the “handmade” look into the “professionally finished” look more than almost any other single action.


Final Fixes That Instantly Improve Your Crochet Quality

When you wrap up a major project, the difference between an amateur finish and a high-end designer piece comes down to the final mechanical details. If you’ve built a solid foundation using the steps above, these three ultimate checkpoints will ensure your work stays completely straight, pristine, and perfectly formed for years to come.

The Golden Loop Calibration. If you find your stitch heights are wildly inconsistent row-by-row even when using the correct hook, look closely at your “golden loop”, the very first loop you pull up through the fabric. If you lift your hook high after pulling this loop up, your stitches will be tall and floppy (making you a “lifter”). If you ride the hook close to the fabric surface, your stitches will be short and dense (making you a “yanker”). Standardizing the height of that golden loop to match the diameter of your hook shaft is the single fastest way to lock in vertical consistency across entire rows.

The Counter-Weight Rest. Heavy, developing projects like blankets, cardigans, or oversized shawls will naturally drag downward while they rest in your lap. This weight pulls on the working loops right at your hook, stretching out your current row and making your center stitches look significantly looser than your edges. To fix this instantly, always support the bulk weight of your project on a table or a firm cushion next to you. Never let the hanging weight of the fabric tension your yarn for you.

The Final Symmetry Roll. Before you weave in your very last tail, lay your work completely flat and gently stretch it diagonally from corner to corner in both directions, then execute a firm “fabric roll” by smoothing it out from the center line to the outside edges with flat palms. This manual reset allows the loops to settle into their natural interlocking channels, instantly eliminating minor tension imbalances and setting your edges into perfect, dead-straight alignment before the first wash.

✦ Recommended For You

  • ✦
    How to Shrink Crochet Projects: A Safe Guide for Sizing
  • ✦
    Crochet in Color: How Yarn Shades Shape Your Mood & Projects
  • ✦
    Granny Square Crochet Projects: Easy, Colorful Ideas for Beginners

Share This Article
Facebook Email Copy Link Print
Previous Article Crochet in Color: How Yarn Shades Shape Your Mood & Projects
Next Article The Leaning Stitch: Why Your Amigurumi Limbs Look Crooked (And the Math to Align Them)
Leave a Comment

Leave a Reply Cancel reply

Your email address will not be published. Required fields are marked *

Empowering Tomorrow's Leaders through Understanding Child Development and Learning

Learning to thrive

Daily Feed

Cinematic Crochet: How to Film High-Impact Short-Form Videos in a Small Workspace
August 6, 2026
The Leaning Stitch: Why Your Amigurumi Limbs Look Crooked (And the Math to Align Them)
May 5, 2026
Why Your Crochet Projects Look Uneven (And How to Fix It Fast)
April 8, 2026
Crochet in Color: How Yarn Shades Shape Your Mood & Projects
March 11, 2026

You Might Also Like

Learn & TechniquesPatterns & Projects

Why Your Amigurumi Looks ‘Inside Out’: The 5 Most Common Beginner Mistakes (& How to Fix Them Instantly)

December 12, 2025
Learn & TechniquesPatterns & Projects

Amigurumi Holes Between Stitches? How to Fix Them

November 11, 2025
Learn & TechniquesPatterns & Projects

Granny Square Crochet Projects: Easy, Colorful Ideas for Beginners

November 16, 2025
Learn & Techniques

Crochet Hook Sizes Guide: US vs Metric Conversion Chart & Tips

November 19, 2025

Subscribe to our newsletter to get our newest articles instantly!

[mc4wp_form]
  • Development
  • Society
  • Technology
  • Learning & Education
Made by ThemeRuby using the Foxiz theme. Powered by WordPress
Welcome Back!

Sign in to your account

Username or Email Address
Password

Lost your password?