


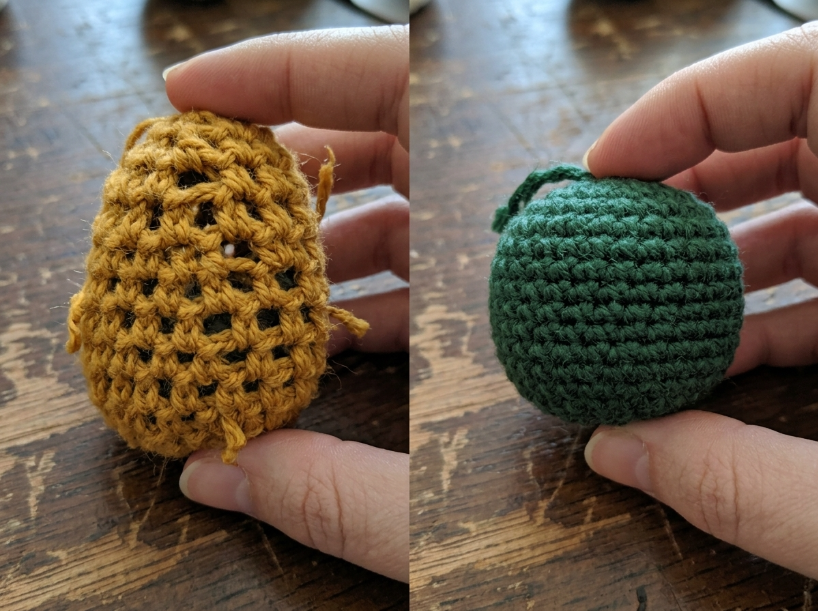
Visible gaps between stitches in amigurumi occur when the hook is too large for the yarn weight, allowing stuffing to push through the fabric. The fix requires adjusting the relationship between hook size, yarn thickness, and tension to create dense fabric that closes those gaps completely.
The Short Answer
Go down one or two hook sizes to create tighter stitches that close the gaps. If holes still appear after stuffing, the hook is still too large for that yarn weight, or your tension needs to be more consistent.
Main Steps
Most guides recommend dropping one hook size when holes appear, and that is correct for projects where the yarn weight matches the hook size you started with. The reasoning is straightforward: a smaller hook forces the yarn to pack more tightly, closing the space between stitches. That said, if you are already using a hook significantly smaller than the yarn label recommends, the problem is not the hook size. It is either inconsistent tension or yarn that has too much elastic memory to hold the tight gauge amigurumi requires.
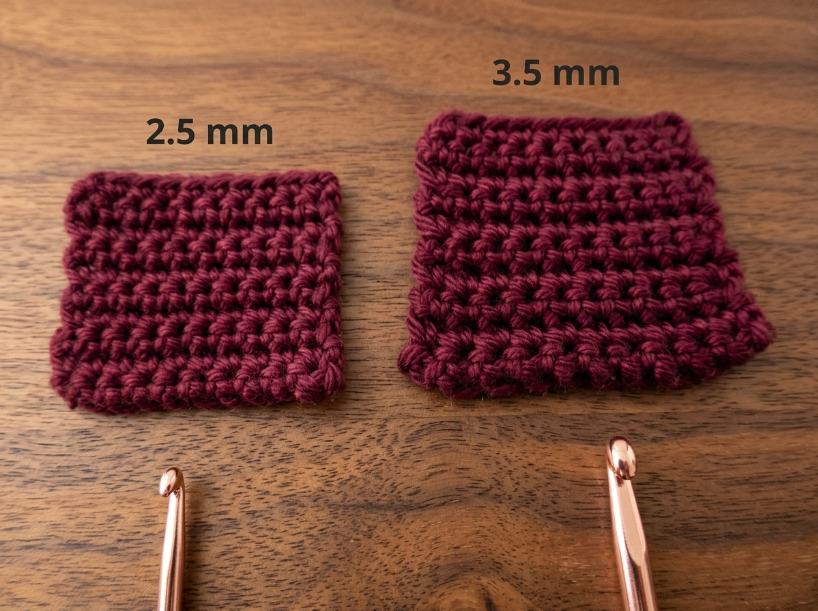
Amigurumi construction depends on working single crochet in continuous rounds with both loops of each stitch. Single crochet creates the densest fabric of the basic stitches because each stitch is short and compact. Working through both loops creates the standard single-crochet structure and generally provides a more stable fabric than working through one loop alone. If you have been working in the back loop only to create a decorative ridge, that creates a structural weakness that allows gaps to open.
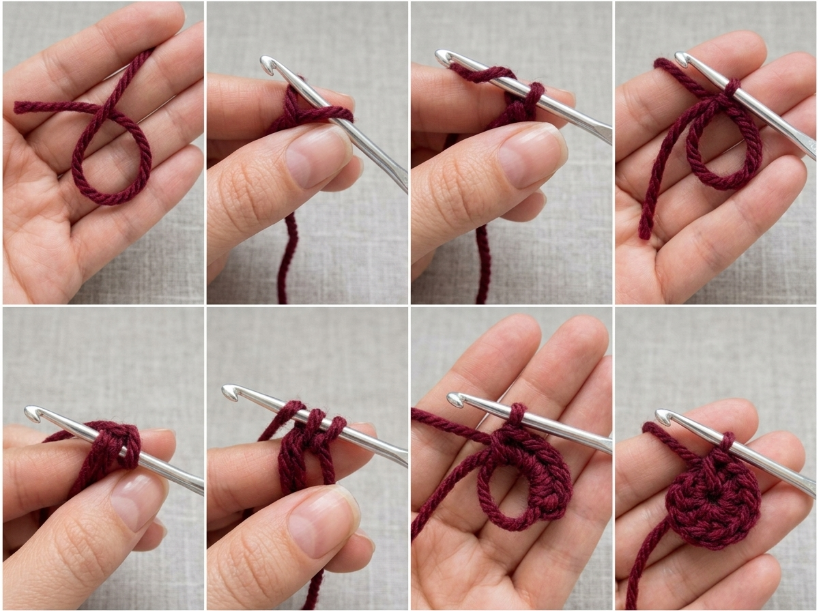
The magic ring start must be pulled completely tight before you begin Round 1. A loose center hole will remain visible no matter how tight the rest of the piece is worked. Pull the tail firmly until the center closes, then hold the tail taut as you work the first few stitches to keep it from loosening again.
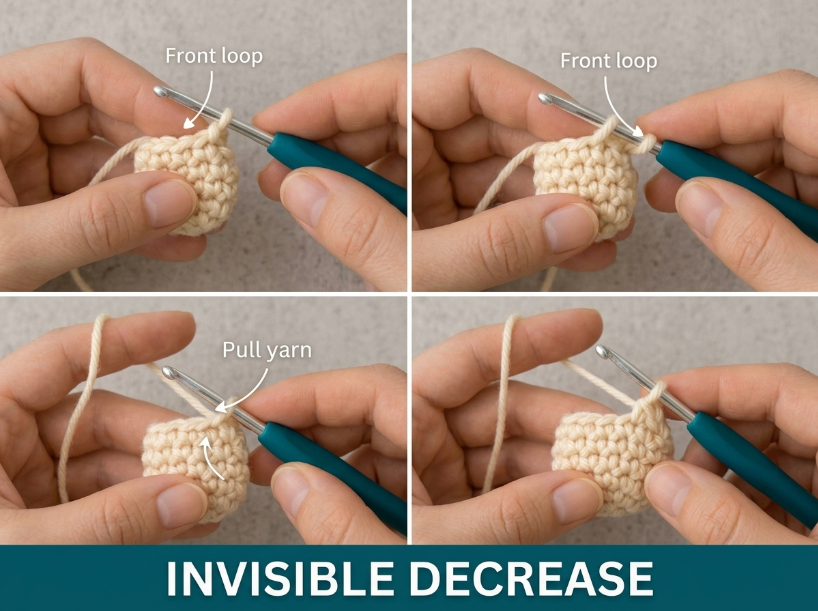
Invisible decreases create cleaner, tighter decreases than the standard sc2tog. To work an invisible decrease, you insert your hook into the front loop only of the first stitch, then immediately into the front loop only of the second stitch, yarn over, pull through the first two loops, and yarn over to pull through the remaining two. This method prevents the small gap that often forms when you work the standard method of pulling up two separate loops. If you notice gaps specifically at decrease points, this technique adjustment is usually the fix. The Leaning Stitch: Why Your Amigurumi Limbs Look Crooked (And the Math to Align Them) covers how stitch alignment affects the final shape when decreases are involved.
| Step | What to do | Watch out for |
|---|---|---|
| Test your gauge | Work a small round piece in single crochet and stuff it firmly | If gaps appear when stuffed, the hook is too large |
| Drop hook size | Go down one or two sizes from your starting hook | Fabric should feel stiff and resist stretching |
| Check your tension | Keep consistent pressure on the yarn throughout | Loose stitches create uneven gaps that show after stuffing |
| Use invisible decreases | Insert under the front loops only of two stitches, then complete the single crochet | Standard sc2tog leaves a small gap at the decrease point |
Comparison / Options
Acrylic yarn can have more give than some cotton yarns, so the fabric may stretch when heavily stuffed, revealing gaps that were not visible during construction. Cotton is a popular choice for structured amigurumi because it generally provides good stitch definition and relatively little stretch. In practice, beginners often find cotton harder to work with because it does not forgive tension inconsistencies the way acrylic does. A cotton-acrylic blend offers middle ground: it holds shape better than pure acrylic while remaining forgiving enough that tension variations do not create visible ridges.
Hook size adjustments work differently depending on whether you are using the yarn weight the pattern specifies. If the pattern calls for worsted weight and you are using worsted weight, dropping from a 4mm (G) to a 3.5mm (E) will close most gaps. If you started with a hook already smaller than the yarn label recommends, going smaller again may create fabric so stiff it is difficult to insert the hook for the next stitch. At that point, the issue is yarn choice or tension rather than hook size alone.
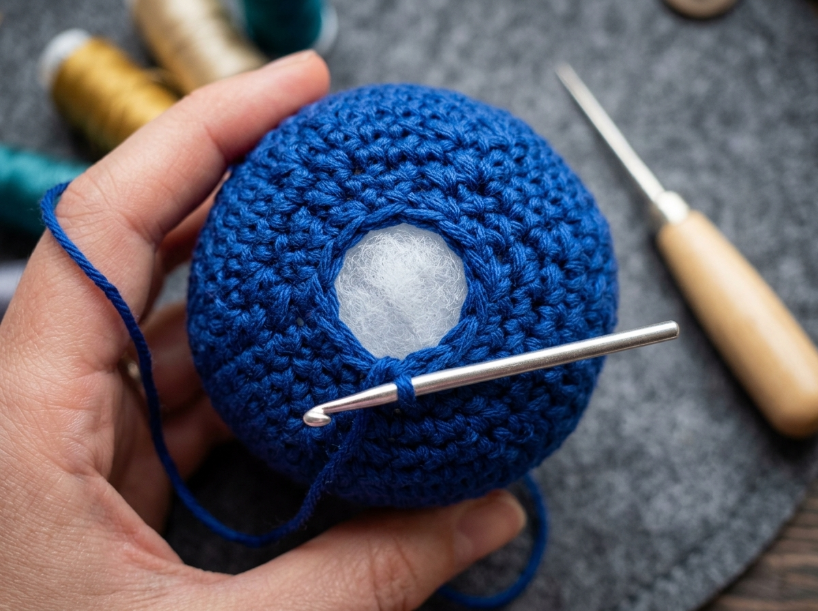
Gauge swatches for amigurumi must be worked in the round and stuffed to test whether holes appear under tension. A flat swatch worked in rows will not reveal the same gaps because the fabric is not being stretched from the inside. Work a small tube, stuff it firmly with the same material you plan to use in the finished piece, and check for visible stuffing. If you can see white polyester fiberfill through the stitches, the gauge is too loose. Why Your Amigurumi Looks ‘Inside Out’: The 5 Most Common Beginner Mistakes (& How to Fix Them Instantly) walks through other structural issues that affect how the finished piece looks, including working on the wrong side of the fabric.
Common Mistakes
Overstuffing stretches the fabric and widens gaps that were previously invisible during construction. The reasoning is mechanical: stuffing pushes outward against the stitches, and if you pack too much material inside, the yarn is forced to stretch beyond the gauge you worked. The catch is that understuffing creates a floppy, shapeless piece that does not hold its form. The fix is to stuff in small amounts, checking the firmness as you go, and stopping when the piece feels solid but the fabric is not visibly straining.
Using a hook size based on the yarn label rather than the project type is a common beginner mistake. Yarn labels recommend hook sizes for garments and blankets, where drape and flexibility matter. Amigurumi requires fabric dense enough to contain stuffing, which means using a hook one or two sizes smaller than the label suggests. If you are following a pattern that specifies both yarn weight and hook size, trust the pattern’s hook recommendation over the yarn label.
Working too loosely creates uneven stitch sizes that show as gaps after stuffing. Tension inconsistency is harder to fix than simply changing hook size because it requires developing muscle memory for how tightly to hold the yarn. In contrast, crocheters who naturally work with tight tension may find they can use a slightly larger hook than the pattern specifies and still achieve dense fabric. If your tension varies significantly from stitch to stitch, practice working small rounds until the stitches look uniform before starting a full project.
Troubleshooting
If holes appear only at the magic ring center, the ring was not pulled tight enough before working Round 1. Pull the tail firmly until the center hole closes completely, then hold the tail taut as you work the first few stitches. If the ring loosens again, weave the tail through several stitches on the wrong side to anchor it before trimming.
Gaps that appear only at decrease points often indicate you are using standard sc2tog instead of invisible decreases. Standard sc2tog involves pulling up two separate loops before completing the stitch, leaving a small gap where the decrease happens. Invisible decreases eliminate this by working through the front loops only, mimicking the look of a regular stitch. If switching to invisible decreases does not fix the gap, the hook is likely still too large for the yarn weight.
Visible stuffing that appears only after the piece has been handled or washed means the yarn has some give that is causing the stitches to stretch over time. Acrylic is a common culprit because synthetic fibers can allow the fabric to return to a relaxed state after being worked tightly. Cotton does not typically have this issue, but switching yarn mid-project is not practical. The fix is to work future pieces with a smaller hook or choose a cotton blend that has less stretch.
If the fabric feels excessively stiff and difficult to work but gaps still appear, changing hook size alone may not solve the problem. Test a different yarn or adjust your tension rather than continuing to size down.
| Mistake | Why it happens | Fix |
|---|---|---|
| Visible stuffing through stitches | Hook too large for yarn weight | Drop one or two hook sizes and test gauge with stuffing |
| Loose magic ring center | Ring not pulled tight before Round 1 | Pull tail firmly until center closes, hold taut while working first stitches |
| Gaps at decrease points | Using standard sc2tog instead of invisible decrease | Work the decrease through the front loops only to mimic a regular stitch |
| Fabric stretches after stuffing | Acrylic yarn can have more give than some cottons | Use cotton or cotton blend, or work with tighter tension throughout |
Deciding Your Approach
The best approach for most readers is to start with the hook size the pattern specifies, work a small test piece, stuff it firmly, and check for gaps. If stuffing shows through, drop one hook size and test again. The reasoning is that patterns are written with a specific gauge in mind, and changing the hook size without testing can create a finished piece that is significantly smaller than intended. That said, if you naturally work with loose tension, you may need to go down two hook sizes instead of one to match the pattern’s gauge.
Yarn choice matters more than hook size when the project needs to hold its shape long-term. Cotton creates denser fabric that resists stretching, making it a popular choice for structured amigurumi. If hand fatigue is a concern, a cotton-bamboo blend offers similar shape retention with slightly more give. Acrylic works well for beginners because it is forgiving and affordable, but pieces worked in acrylic will stretch more over time, revealing gaps that were not visible during construction.
Questions You Might Still Have
Q: How should a beginner fix holes between stitches?
Drop one hook size and work a small test piece to see if the gaps close. If you are already using a hook smaller than the yarn label recommends, the issue is likely inconsistent tension rather than hook size. Practice working small rounds with even pressure on the yarn until the stitches look uniform.
Q: How long does fixing this issue take from start to finish?
Testing a new hook size takes the time it takes to work a small stuffed tube, which varies widely depending on your working speed. The adjustment itself is immediate once you have identified the right hook size. Rebuilding tension consistency takes longer because it requires developing muscle memory.
Q: Which hook size and yarn weight do I need for tight amigurumi fabric?
Many amigurumi patterns use worsted weight yarn with a 3.5mm to 4mm hook, or DK weight yarn with a 2.5mm to 3mm hook. While it is a useful rule of thumb to use a hook one or two sizes smaller than the yarn label recommends, the pattern’s specific hook size and gauge should always take priority. Test with stuffing before committing to a full project.
Q: Why do my gaps only appear after stuffing?
Overstuffing stretches the fabric and widens gaps that were not visible during construction. Also, if you use standard sc2tog instead of invisible decreases, those small gaps at decrease points will stretch and show visibly once stuffing is introduced.
Q: What should I do if the fabric still has holes after changing hook size?
If dropping two hook sizes does not close the gaps, the yarn may have too much elastic memory to hold tight gauge. Switch to cotton or a cotton blend for future projects. For the current piece, you can line the inside with a thin fabric to hide the stuffing, though this adds bulk.
Q: Is there a faster way to create tight fabric?
The fastest solution is usually to use the correct hook size and tension from the beginning rather than reworking finished pieces. Aim for a firm fabric without forcing the yarn or straining your hands.
📅 Last reviewed: August 2026 · This article is reviewed every 12 months.
Summary
Visible gaps between amigurumi stitches are usually fixed by using a hook one or two sizes smaller than the yarn label recommends, working single crochet through both loops, and maintaining consistent tension throughout. Cotton generally holds tight gauge better than acrylic because it lacks elastic memory, but beginners often find cotton-acrylic blends easier to work with while still closing gaps effectively. If dropping hook size does not eliminate visible stuffing, the yarn’s fiber structure or your tension consistency may be preventing the stitches from holding a tight gauge.

