


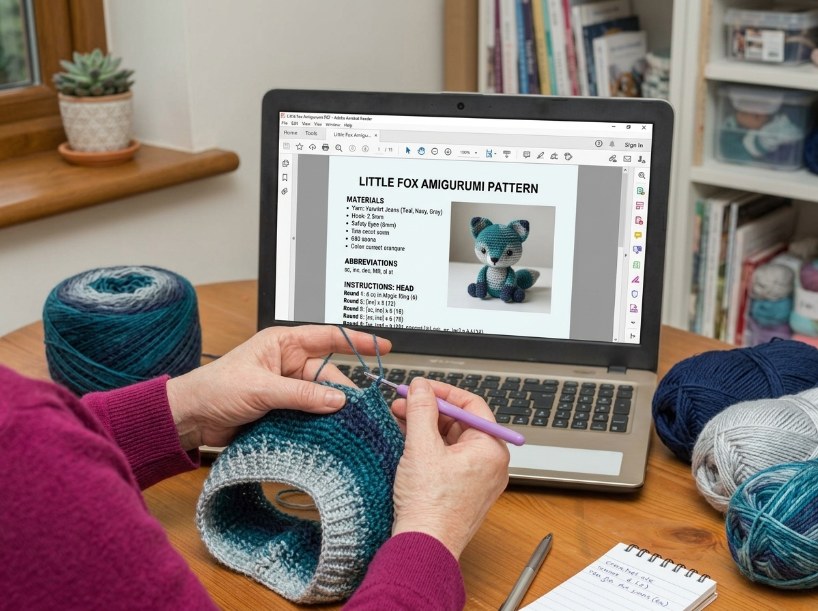
Crochet patterns compress hours of instruction into shorthand that looks cryptic until you understand the logic behind it. A line like (sc, inc) x 6 (12 sts) tells you what to do, how many times to repeat it, and, in this example, the expected stitch count at the end, but only if you know how to parse the symbols. The difference between a pattern that feels impossible and one that flows naturally often comes down to recognizing three or four formatting conventions.
The Short Answer
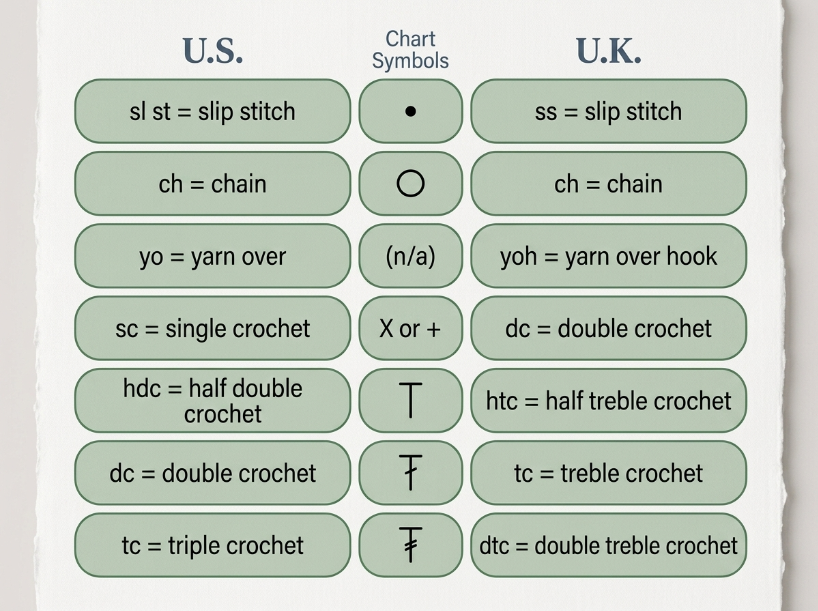
Many crochet patterns use asterisks to mark repeats, parentheses or brackets to group instructions, and a stitch count at the end of a row or round to show how many stitches you should have. US and UK crochet terminology differs for several important stitch names, so check which system the pattern uses before starting.
Main Steps
Most guides tell you to start by memorizing abbreviations, and that works if you are reading a simple scarf pattern with repetitive rows. The reasoning is that once you know “sc” means single crochet and “dc” means double crochet, you can follow the instructions line by line without constantly flipping to a glossary. That said, memorization alone won’t help you parse a complex amigurumi pattern where the structure depends on understanding how asterisks, parentheses, and brackets interact. If the pattern includes symbol charts, you need to cross-reference the written instructions with the diagram to catch details like stitch placement and turning direction that aren’t always spelled out in words.
The better starting point is learning how repeat markers work, because that is where most confusion happens. Asterisks mark the beginning and end of a section you will work multiple times, so sc, inc x 6 means you repeat the sequence between the asterisks six times total. Parentheses can group stitches worked together in the same stitch or space, or group a sequence of instructions that is repeated. A stitch count at the end of a row or round shows how many stitches you should have, which lets you catch mistakes before they compound.
| Step | What to do | Watch out for |
|---|---|---|
| Check terminology | Confirm whether the pattern uses US or UK terms before starting | US single crochet equals UK double crochet, so working the wrong system will throw off your stitch height |
| Identify repeat markers | Look for asterisks marking sections to repeat, and note the number of times specified | Repeats can nest inside other repeats, so track which set of asterisks you are currently working |
| Read stitch groupings | Parentheses and brackets can group instructions or stitches, check the pattern’s key to see how the designer uses them | Missing a parenthesis means you will place stitches in the wrong spots and your count will be off |
| Cross-reference diagrams | If the pattern includes a symbol chart, compare it to the written instructions to catch placement details | Diagrams show stitch relationships visually but don’t always specify yarn weight or hook size |
Comparison / Options
Written patterns spell out every instruction in text form, which makes them easier to follow if you are comfortable reading abbreviations and can track your place in a long paragraph. The reason written patterns dominate beginner tutorials is that they force you to think through each stitch in sequence, which builds understanding of how the fabric forms. In contrast, symbol charts show the entire structure at a glance, making it easier to see how stitches relate spatially and where increases or decreases fall. The catch is that symbol charts require you to learn what each symbol represents. Chart symbols are generally more consistent across terminology systems, but you should still check the pattern’s symbol key because designers may use variations or custom symbols.
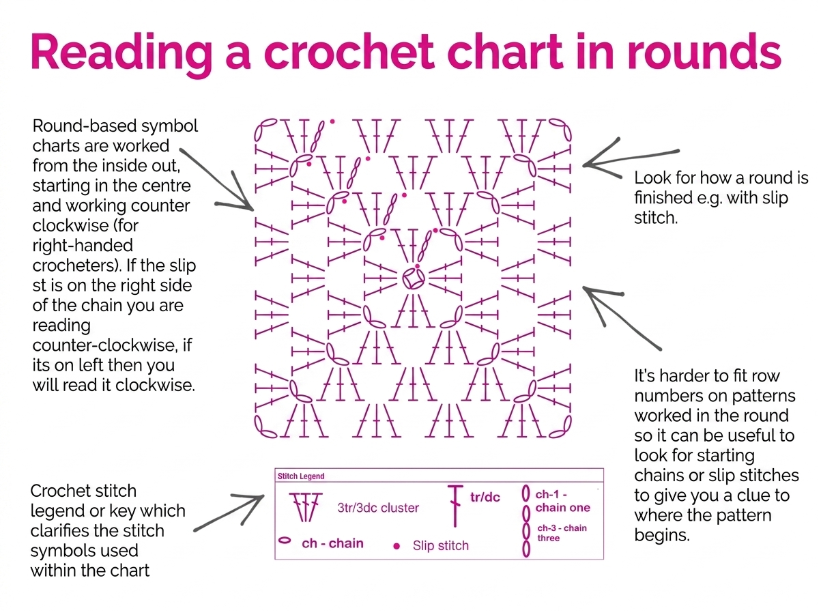
Most crocheters eventually use both formats together. A written pattern tells you the exact stitch sequence, while the diagram shows you whether the fabric is supposed to curve, expand, or stay flat. This is especially useful for amigurumi, where the written instructions might say “sc around” for ten rounds, but the diagram reveals that you are building a sphere and shows exactly where the invisible increases fall. The alternative is working purely from diagrams, which speeds up the process once you are fluent in the symbols but leaves you guessing about yarn weight and hook size if those details aren’t noted separately.
Common Mistakes
Most beginners assume that all crochet patterns follow the same abbreviation system, which leads to confusion when a UK pattern uses “dc” to mean what US crocheters call “sc”. The reasoning behind this mistake is that both systems use the same letters, so it is easy to miss the note at the top of the pattern specifying which terminology applies. The result is stitches with the wrong height, which can throw off the dimensions and structure of the project. Before starting, check the pattern’s glossary or introduction to see which terminology system it uses.
Another common error is miscounting stitches because the pattern uses nested repeats and you lose track of which set of asterisks you are currently working. This happens because patterns can include one repeat inside another, such as (sc, inc x 3), (dc, ch 1 x 2), where each repeated group has its own multiplier. The fix is marking your place with a stitch marker or a piece of scrap yarn every time you complete one full repeat, so you can see at a glance whether your count matches the number at the end of the row. That said, some patterns don’t include stitch counts at all, which means you have to calculate the total yourself by multiplying out the repeats.
Troubleshooting
If your stitch count is consistently off by the same number every round, the problem is usually a missed increase or decrease inside a repeat section. The reason this happens is that when you are working through a long sequence of stitches, it is easy to skip the “inc” or “dec” notation and work a plain stitch instead. The fix is going back to the previous round and counting each stitch type individually, comparing your work to the written instructions one stitch at a time. This takes longer than re-counting the total, but it catches the specific spot where the error occurred. In practice, this method doesn’t help if the mistake happened several rounds ago and you have already stuffed or shaped the piece, in which case you may need to decide whether the difference is visually obvious enough to warrant ripping out the work.
If a chart and written instructions seem to disagree, first check the chart’s key, starting point, reading direction, and whether the project is worked in rows or rounds. Charts can use different conventions for showing right-side and wrong-side rows, so the pattern’s instructions should take priority when the designer provides specific guidance.
| Mistake | Why it happens | Fix |
|---|---|---|
| Wrong stitch height throughout | Confusing US and UK terminology when pattern doesn’t specify | Check the glossary or introduction for terminology system before starting first row |
| Stitch count off by same number every round | Missing an increase or decrease notation inside a repeat section | Count each stitch type individually in the previous round, comparing to written instructions |
| Can’t find where to place next stitch | Parentheses indicating grouped stitches worked into same space were missed | Look for parentheses in the written pattern and work all stitches inside them into one stitch or space |
| Symbol chart doesn’t match written instructions | The chart and text follow different conventions for reading direction or right-side tracking | Follow only the written instructions for now, and prioritize the designer’s specific guidance |
Questions You Might Still Have
Q: What is the easiest way to start reading crochet patterns and symbols for a beginner?
Start with a pattern that includes both written instructions and a symbol chart, so you can cross-reference the two formats and build familiarity with how abbreviations translate to visual symbols. Look for patterns that specify US or UK terminology clearly at the top and include stitch counts at the end of every row. Avoid patterns with nested repeats or complex stitch groupings until you are comfortable tracking basic repeat markers.
Q: How long does it take to read and understand a new crochet pattern?
Reading through a pattern the first time typically takes a few minutes, but the time varies significantly depending on the pattern’s complexity and whether you need to look up unfamiliar abbreviations. A simple dishcloth pattern with repetitive rows can be scanned quickly once you know the abbreviations, while a complex amigurumi pattern with multiple color changes and nested repeats may take longer to parse. The learning curve flattens quickly once you have worked through a few patterns in the same format.
Q: What hook size and yarn weight do I need when following a new pattern?
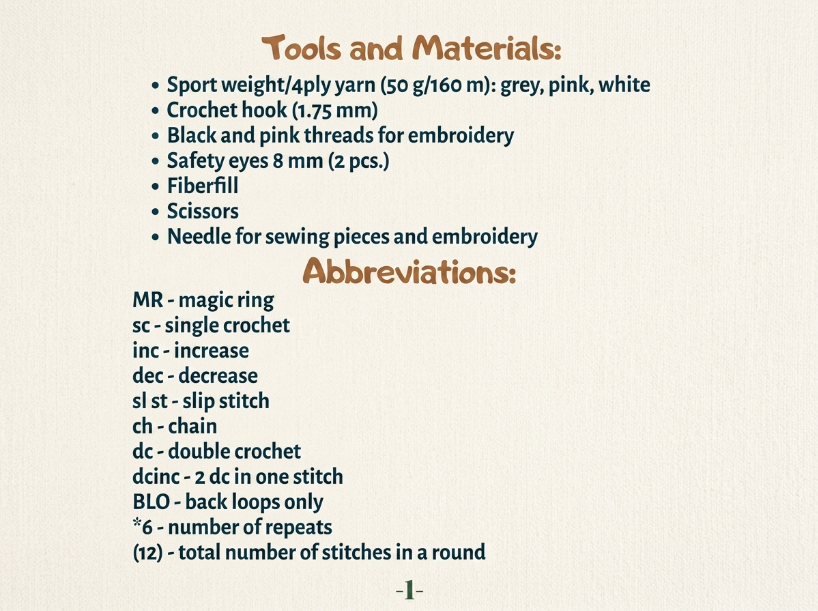
The pattern itself should specify the recommended hook size and yarn weight in the materials section at the beginning, usually listed in both US letter sizes and metric millimeters. If the pattern only lists yarn weight by number or name, you can match it to the standard weight system where fingering is 1, sport is 2, DK is 3, worsted is 4, and bulky is 5. Hook size recommendations are starting points, and you may need to adjust based on your tension to match the gauge specified in the pattern.
Q: What are the most common mistakes when reading crochet patterns?
A common error is confusing US and UK terminology when the pattern doesn’t specify which system it uses, which results in stitches with the wrong height and can throw off the dimensions and structure of the project. Another common mistake is losing track of nested repeats and working the wrong number of repetitions, especially in patterns that use multiple sets of asterisks or brackets. Miscounting stitches because you skipped the increase or decrease notation inside a repeat section also happens often, particularly in amigurumi patterns where the shaping is subtle.
Q: How do I fix a mistake when following a crochet pattern?
If your stitch count is off, go back to the previous row and count each stitch type individually, comparing your work to the written instructions one stitch at a time to find where the error occurred. For terminology confusion, verify whether the pattern uses US or UK terms by checking the glossary or introduction, then rework the affected rows with the correct stitch heights.
Q: Is there a faster method for reading crochet patterns?
Once you have memorized the most common abbreviations and understand how repeat markers work, you can scan patterns much faster by focusing on the structure rather than reading every word. Symbol charts speed up the process significantly because they show the entire stitch relationship at a glance, letting you see increases, decreases, and shaping without parsing text. The tradeoff is that charts require upfront time to learn the symbol system, and they don’t always include details like yarn weight or hook size that you need to start the project.
📅 Last reviewed: August 2026 · This article is reviewed every 12 months.
Summary
Many crochet patterns use asterisks to mark repeats, parentheses or brackets to group instructions, and a stitch count at the end of a row or round to show how many stitches you should have. A helpful approach for many beginners is starting with patterns that include both written instructions and symbol charts, but this doesn’t apply if you are working on a simple repetitive project where the written instructions alone are sufficient. US and UK crochet terminology differs for several important stitch names, so always check which system the pattern uses before starting your first stitch.

