


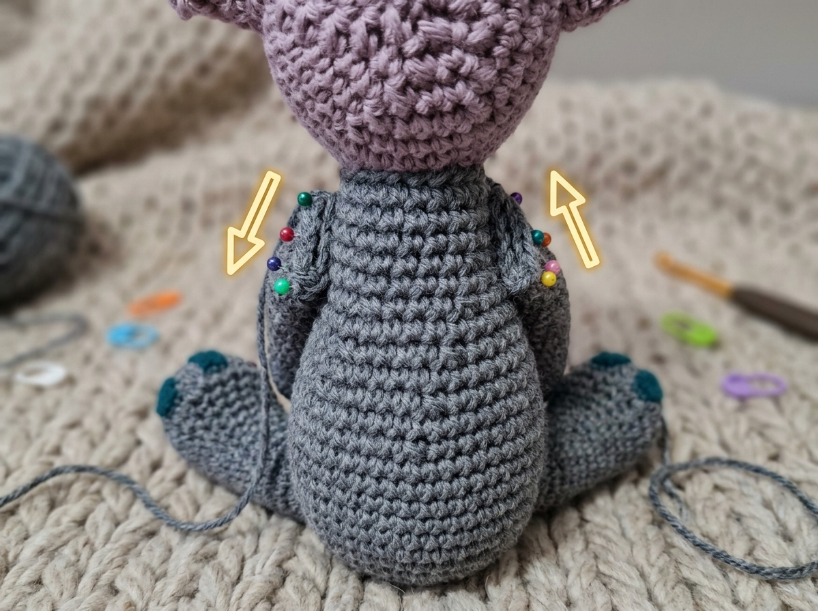
You pinned both arms to the body at what looked like the perfect spot, but when you step back, one sits higher than the other. The issue isn’t always your measuring. When you work single crochet in continuous rounds, the stitches and round starts naturally shift in a spiral. This can make certain details look slanted and can make limb placement harder to judge visually.
The Short Answer
Amigurumi limbs can look crooked for several reasons, including uneven placement, differences in tension or limb length, and the spiral shift that occurs when working continuous rounds. When a pattern calls for symmetrical limbs, position them at corresponding points on the torso and check their alignment from multiple angles before sewing.
For details such as thumb shaping or color stripes, you can use shift stitches to adjust the position of the detail and keep it more visually aligned.
Main Steps
A straight count of the rounds can help you place limbs consistently, but it isn’t the only thing that determines how symmetrical they look. Differences in tension, stuffing, limb length, or the shape of the body can affect the final position.
Single crochet worked in continuous rounds without slip-stitch joins naturally follows a spiral path. Each stitch is worked slightly higher around the circumference rather than closing into a perfectly stacked horizontal round. This is a normal characteristic of crocheting in continuous rounds.
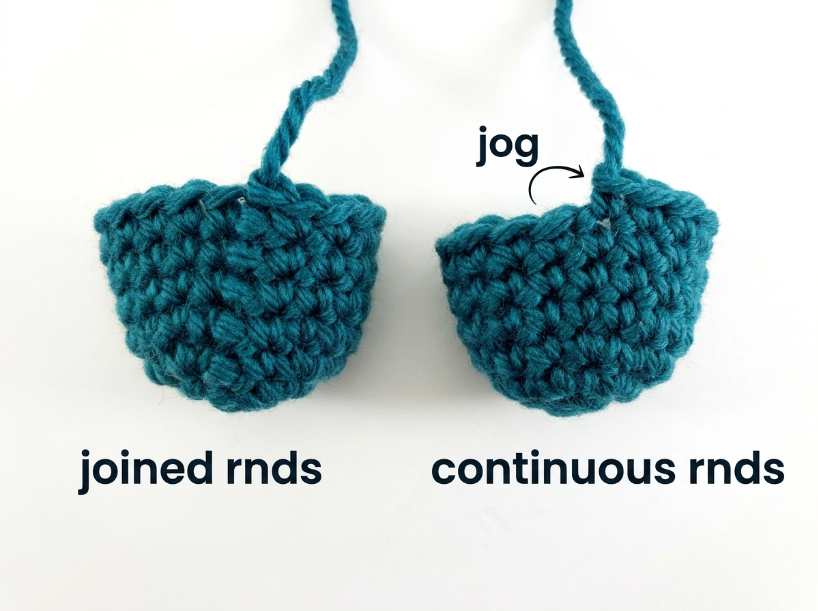
When you crochet a limb in continuous rounds, the start of each round shifts along the spiral direction. This can make color changes, stripes, or some shaping details appear slanted even when you followed the pattern correctly.
To keep a detail more visually aligned, designers can use shift stitches. This means adjusting the position of the detail by moving the working point by one or more stitches, depending on the pattern and how much the detail has shifted. This can help keep a thumb, stripe, or other feature visually aligned.
The amount of visible shift can vary depending on the stitch pattern, tension, yarn, hook, and size of the piece, so there isn’t a universal number of shift stitches that works for every project.
| Step | What to do | Watch out for |
|---|---|---|
| Work the limb in continuous rounds | Use a stitch marker to track the start of each round. | The round start naturally shifts along the spiral. |
| Adjust details when needed | Use the shift specified by the pattern before a thumb, stripe, or other detail. | Too much adjustment can move the detail too far in the opposite direction. |
| Pin limbs to the torso | Position symmetrical limbs at corresponding points on the body. | Don’t rely only on stitch counting; check the finished shape visually. |
| Check alignment | View the doll from the front and both sides before sewing. | A position that looks correct from one angle may look different from another. |
Comparison / Options
Continuous rounds are commonly used for smooth amigurumi pieces because they avoid a pronounced joining seam. On a plain arm or leg, the spiral shift may not be noticeable enough to matter. However, if a limb has a color stripe, thumb, or other detail that needs to stay visually aligned, the shift can become more noticeable.
One option is to keep working in continuous rounds and use shift stitches when the pattern calls for them. Another is to work in joined rounds, where each round is closed with a slip stitch before the next round begins.
Joined rounds avoid the continuous spiral structure and can make round-based details easier to align. The tradeoff is that joining creates a visible seam or join in the fabric, so the choice depends on the appearance and construction you want.
For limb attachment, pin both arms in place, check their position from the front and both sides, and then sew them on once you’re satisfied with the placement. A visual reference such as the doll’s face, eyes, or a center-front stitch marker can help you compare the two sides.
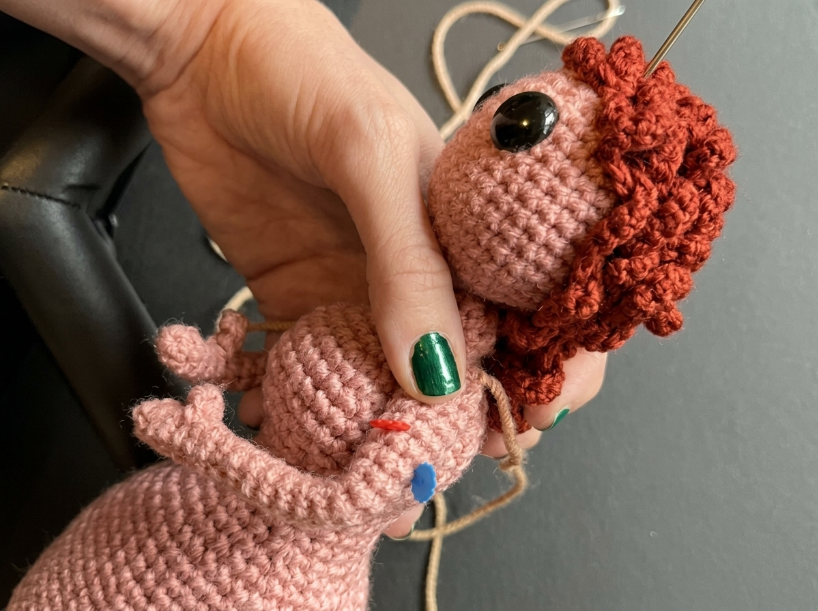
If the torso is symmetrical, you can also measure the distance from a fixed reference point to each attachment point. The goal is not simply to make the stitch counts match, but to make the finished limbs look balanced on the completed shape.
Common Mistakes
One mistake is assuming limb length determines where to attach it to the body. When a pattern calls for symmetrical arms, the attachment points are generally positioned at corresponding locations on the torso. The length of the limbs determines how far they extend from those attachment points.
Another frequent error is placing limbs based purely on stitch count without checking visual alignment. Stitch count works best when the pieces have been made with consistent tension and the body itself is symmetrical. Small differences in tension or stuffing can change how the finished pieces sit.
A better method is to pin both limbs in place, step back, and check their alignment from multiple angles before sewing. If necessary, adjust the position slightly before committing to the attachment.
Some crocheters try to fix spiral shift by changing hook size or tension. Changing hook size can alter the size and appearance of the stitches, but it does not eliminate the spiral structure of continuous rounds.
Amigurumi patterns often use a smaller hook than the yarn label suggests to create a firm fabric and help prevent stuffing from showing through. If a detail needs to stay visually aligned, adjusting its position or using joined rounds may be more appropriate than relying on tighter tension.
Troubleshooting
If your limbs look crooked after you’ve sewn them on, first check whether the attachment points are at corresponding positions on the torso. Count the rounds from a fixed point on the body and compare the two sides.
If the attachment points are different, reattaching the limb may solve the problem. If the limbs themselves differ in length, one limb may need to be adjusted before reattaching it.
When a thumb or color stripe looks slanted even though you followed the pattern, the continuous-round structure may be contributing to the shift. Check whether the pattern specifies a shift stitch or another adjustment before the detail begins.
If the pattern doesn’t include an adjustment, you can experiment with repositioning the working point by a stitch or two and checking the result before continuing. The amount of adjustment needed depends on the particular piece, so there is no universal shift that works for every limb.
If your limbs look level from the front but crooked from the side, check the placement from both directions before sewing. Use the doll’s face, safety eyes, center-front stitch marker, or another fixed reference point to compare the two sides.
| Mistake | Why it happens | Fix |
|---|---|---|
| Arms sit at different heights | Attachment points or tension differ between the two sides. | Compare the attachment points from a fixed reference point and reposition if necessary. |
| Thumb or stripe looks slanted | Continuous rounds shift the working position around the piece. | Use the shift specified by the pattern or adjust the detail’s starting position. |
| Limbs look level from the front but crooked from the side | Placement was checked from only one angle. | Check alignment from the front and both sides before sewing. |
| Color change spirals around the limb | Continuous rounds naturally shift the position of the round start. | Use a planned color-change adjustment or joined rounds when appropriate. |
Questions You Might Still Have
The simplest approach for most plain limbs is to work in continuous rounds and accept the small spiral shift that naturally occurs. If a thumb, stripe, or other feature needs to stay visually aligned, use the adjustment specified by the pattern or consider joined rounds.
Continuous rounds provide a smooth, seam-free appearance, while joined rounds create a visible join but can make round-based details easier to align. Neither method is universally better; the appropriate choice depends on the design and the details you want to keep aligned.
For limb attachment, position symmetrical arms at corresponding locations on the torso and check the result visually before sewing. Using the doll’s face, safety eyes, center-front marker, or another fixed point can make comparison easier.
If budget is the priority, continuous rounds require no additional joining step and are a straightforward choice for simple limbs. If a limb contains stripes, color changes, or shaping details that need careful alignment, planning for those details can require additional steps.
Questions You Might Still Have
Q: What is the easiest way to align amigurumi limbs for a beginner?
Pin both arms to the torso at corresponding positions, then check their alignment from the front and both sides before sewing. Use the doll’s face, safety eyes, or a center-front stitch marker as a visual reference.
If the arms still look crooked after pinning, adjust their placement slightly and check again before sewing them permanently.
Q: How long does aligning and attaching amigurumi limbs take from start to finish?
The time varies depending on the size of the project and your experience. Pinning both arms and checking their alignment usually takes only a few minutes. Sewing them securely with a yarn needle can take longer, especially if you’re new to attaching amigurumi pieces.
The alignment itself is usually quick; most of the time is spent positioning and securely sewing the limbs.
Q: What hook size and yarn weight do I need for amigurumi limbs?
The appropriate yarn and hook size depend on the pattern and the size of the finished project. Many amigurumi patterns use a hook smaller than the yarn label’s general recommendation to create a firm fabric with small gaps between stitches.
If you’re using worsted-weight yarn, a hook around 3.5 mm or 4 mm may be suitable for some amigurumi projects, but you should follow the pattern’s recommended hook size when one is provided.
Your tension also affects the finished fabric. If you crochet loosely, you may need to adjust the hook size to achieve a firm fabric. Check the fabric for visible gaps before stuffing the piece.
Q: What are the most common mistakes when attaching amigurumi limbs?
One common mistake is attaching limbs based purely on stitch count without checking the finished shape from multiple angles. Differences in tension, limb length, stuffing, or body shape can affect how symmetrical the finished doll looks.
Another mistake is sewing the limbs on before checking their placement carefully. Pinning them first lets you adjust their position before committing to the final attachment.
Q: How do I fix it if my amigurumi limbs look crooked after sewing?
If the arms are slightly misaligned, unpick the stitches and reposition them at corresponding points on the torso. Check the distance from a fixed reference point such as the bottom of the head, eyes, or center front.
If the limbs themselves have different lengths, reattaching them may not solve the problem. In that case, adjust the shorter or longer limb before attaching it again.
For a thumb or color stripe that looks slanted, check whether the continuous-round construction is causing the detail to shift. If necessary, unravel back to the affected section and reposition the detail using the adjustment specified by the pattern.
Q: Is there a faster method for aligning amigurumi limbs?
For simple limbs, working in continuous rounds is a straightforward option because there is no joining step between rounds. The slight spiral shift may not be noticeable on a plain limb.
If a limb has a stripe, thumb, or other feature that needs to stay visually aligned, planned shift stitches can help. Joined rounds are another option when keeping round-based details aligned is more important than avoiding a visible seam.
The fastest method depends on the design and how precise the alignment needs to be.
📅 Last reviewed: August 2026
Summary
Amigurumi limbs can look crooked for several reasons, including uneven attachment, differences in tension or limb length, body shape, and the natural shift that occurs when working continuous rounds. Continuous rounds follow a spiral path, which can make color changes and other details appear slanted.
For symmetrical limbs, compare the attachment points using a fixed reference and check the finished placement from multiple angles before sewing. For details that need to stay visually aligned, use planned shift stitches or consider joined rounds. Once you understand how continuous rounds affect the position of stitches, you can choose the approach that best fits the design.
This article is reviewed every 12 months.

